Friday 21 January 2011

How to....Add a Facebook 'Like Us' Box to your Website

Happy Friday Folks!

Today I'm going to show you how to add a 'Like Us' bos for your Facebook page to your website. It's a bit of an update from our 'How to add a Find us on Facebook button' post.

Step 1: Go to your business page on Facebook.
(If you haven't already got one, see our guide on how to create a Facebook page for your business.)

Click the button labeled 'Edit Page' in the top right hand corner of the page.

Screenshot of Picseli's Facebook page

Step 2: Click on the Marketing link

From the menu on the left hand side, click on the 'Marketing' link.


Step 3: Get the box

Here you will see a list of the options available to help you market your Facebook page & get more 'likers'.


Click on the 'Add a Like Box to youu Website'

Step 4: Customise your box

On this page you'll see an example box that you can customise to suit your company.


As you make changes to this little form you should see the example box on the right update to reflect your changes. 


- Facebook Page URL: In this box you need to enter the URL or web address of your facebook page. In our case it is http://www.facebook.com/picseli.

(If you don't have a customised or vanity URL yet, then you'll need to open up another browser window or tab, so you don't lose your current place, and navigate to yoru Facebook page. Then in the address bar at the top of the browser copy the whole text that appears starting with http://www.facebook.com/....., then paste this into the Facebook Page URL box.)

- Width: If you have a special place for your Facebook box to go, you'll know how wide it needs to be, so enter this width - in pixels - in this box.

- Colour Scheme: You can either have 'Light' (which leaves it white) or 'Dark' (which turns it black), so select dark, see what you think and make your decision. For Picseli, we'll be leaving it as Light.

- Show Faces: If you untick this option, you won't see the icons or avatars of the people who currently like your page.

- Stream: If you untick this option you will be left with just the people who like your page, not the latest posts to your page.

- Show Header: Untick this if you don't want the 'Find us on Facebook' banner at the top of the box.

So you can make your box as complicated or as simple as you like, showing your latest posts and 'likers' - as we have done in the right hand bar on this blog - or just have a simple 'Your Company on Facebook' link, as in the image below.

When you're happy with your box, select the 'Get Code' button.

Step 5: Display on your website

You'll get a pop up box with 2 code options, so copy whichever one suits you best (or copy both & send them to your web developer) and add them to a suitable place on your website or blog.

And there you have it, visitors can Like your Facebook page from the comfort of your own blog. Hope it helps!

P.S If you do enjoy these posts, please do come and like us on Facebook - don't foget to say Hi!

Wednesday 19 January 2011

MODx Revolution Tutorial for beginners – Part 2

Introduction
Ok, so following on from Part 1 of this guide, you should have your install of MODx Revolution up and running! If you use your username and password that you selected during the installation process, you’ll be able to login and see the MODx manager administration screen. Pretty, isn’t it?

With MODx Revolution, you start from a completely clean slate. If you’ve used MODx Evolution before, you’ll notice that there is no pre-installed site template, or content, or extras. All you get is a very basic template which just outlines the default HTML tags, and a single resource with no content in it. For me, this is a big plus for Revolution. I don’t have to go in and remove a load of bits I don’t want to use. I can just fetch add-ons when I want them.

Site Configuration
There are lots and lots of different ways you can configure MODx from the Manager. You’ll need to use the System Settings at various times throughout a project, so it’s probably wise to have a quick look into how it all works before we get started on anything too serious!

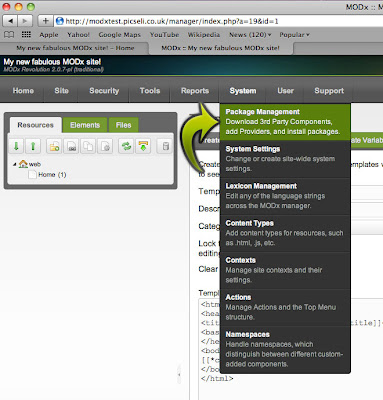
So, in the Manager, hover your cursor over ‘System’ and select ‘System Settings’ from the drop down menu. You’ll then be taken to the System Settings screen where you can set general preferences and configuration settings for the MODx manager interface, as well as how your MODx site runs.


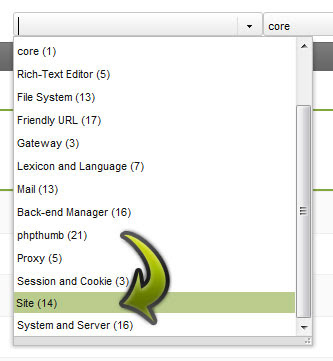
Feel free to have a good look through all of the different options you can change here. There is a ‘Filter by area’ drop down where you can choose to look at settings associated with a certain area (Friendly URLs for example), a text search where you can simply type in the name of the setting you’re looking for, or a drop down where you can look at settings for some of your add-ons (don’t worry, you shouldn’t have any yet and by default, this option is set to ‘core’. You can also create your own settings, but that’s definitely for another day!

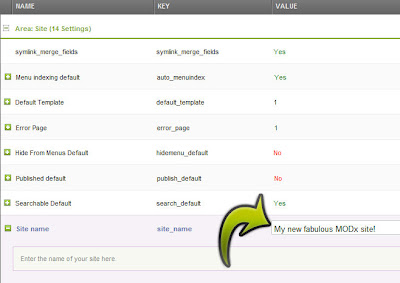
What I want to alter now is the name of your site. In your default template, the name of your site is currently being used in the title tag. In most cases, this would be the name of the company who’s website you’re building, or your name if it’s a personal site. To find the setting we want to change, use the ‘filter by area’ drop down menu, and select ‘Site’.


Your settings should change, and if you look half way down the list you’ll see a setting entitled “Site Name”. Double-click on the default Site Name (it will probably read ‘MODx Revolution’) and alter it to whatever you like. I’ve changed mine to “My new fabulous MODx site!”.


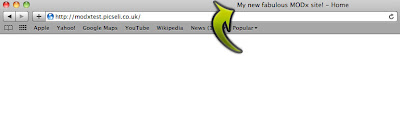
Hit the enter key, and you’re done. Easy eh? There’s no need to hit a save, or submit button, as soon as you’ve amended the setting and hit enter, you’re done. Now, if you go to another browser tab or window, and load up the front end of your site, you should see that the title of your page has changed to the Site Name you just entered. Have a look at the Source too. This will show you that the new Site Name has been placed inside the title tag. Now I’ll show you why it’s appeared there.


A quick intro to Templates
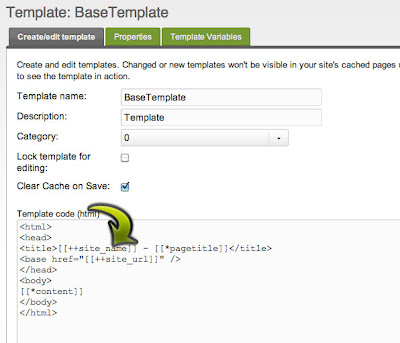
If you go back into your Manager, on the left-hand side you’ll see a box with three tabs called Resources, Elements and Files. We’ll be using Resources more in the next part, so for now, click on Elements. You’ll see a list of categories, all with different icons. Now don’t be afraid, you’ll learn what all of these are, and what they do throughout this series of tutorials. The one we’ll use for now is Templates. If you click the small arrow next to Templates, it should open and you’ll see one little file underneath it called ‘BaseTemplate’. This is the simple template that you’re provided with when you download MODx Revolution.

As the name suggests, templates provide your site with structure. You can apply a different template for every single page on your site if you wish, or, more likely, you’ll have just a few different templates ensuring that your site has the same look and feel throughout.
If you look at the code in the template, inside the title tag you’ll see an odd looking piece of code that looks something like [[++site_name]]. Yep, you guessed it, this is your Site Name! That specific syntax ([[++something_or_other]]) is used for MODx system settings. More about that later.


Installing Add-ons
So I think so far we’ve established that MODx Revolution is incredibly cool. Well, we’re just getting started, so be prepared for way more coolness. We can raise the cool factor tenfold by installing add-ons for our site.

Add-ons help us to perform tasks within MODx that make it much more dynamic. There are lots of different add-ons, way too many to go into, and the amount is growing on a daily basis. In MODx Evolution, some of the more popular add-ons were pre-installed, and to get others, you had to go to the MODx website, download the files, upload them to your site via FTP or copy and paste the code into a new snippet. Either way, it wasn’t ideal, and this has been addressed in MODx Revolution, where you can download and install add-ons within the manager. Brilliance!

One add-on that you’re likely to want to install (especially if you’re going to be handing the site over to somebody not code-savvy at some point) is TinyMCE. TinyMCE is a rich text editor, meaning we don’t have to delve through the code to add paragraphs, headings, images etc.

So, hover over ‘System’, and then select ‘Package Management’ (catchy eh?!).


You’ll see two buttons, one called ‘Add new package’ and the other called ‘Download Extras’.


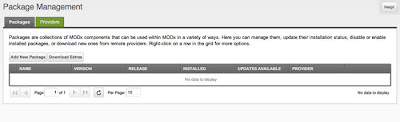
Click on ‘Download Extras’, and you’ll see a dialog screen. This is another place that you’ll become very familiar with if you’re building MODx sites with some degree of complexity, so before we download anything, feel free to have a little look around to see what’s on offer.


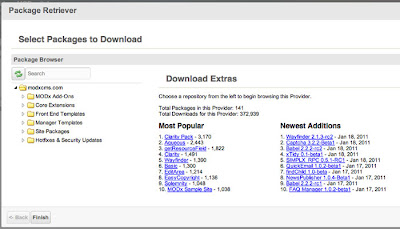
There are a series of different categories on the left. A nice little explanation of these is given for each of these on the Codingpad, but for those too lazy to click a link, it is as follows:
  • MODx Addons – these are functional bits and pieces that are not part of the MODx core, such as galleries, menu builders, tagging snippets, etc. They do not change the core but simply add functionality.
  • Core Extensions – These are additions to the core itself that change how MODx works. They affect how parts of the core work.
  • FrontEnd Templates – These are ready made templates that are packaged for an easy install and setup. If you don’t want to build/port your own template you can grab one of these and play with them, use them as they are, or modify them to suit your needs.
  • Manager Templates – These are backend templates to change the look of your manager. These will affect just the look, not the functioning, of your manager.
  • Site Packages – These are prebuilt complete sites that you can install and explore. This is great if you just want to demo MODx and see how it works. A prebuilt site like this can also be a great learning tool as you can explore the backend and learn how different things are implemented.
You’ll probably find yourself within the MODx Add-ons category most often (I do anyway), and thats where we’re going now.


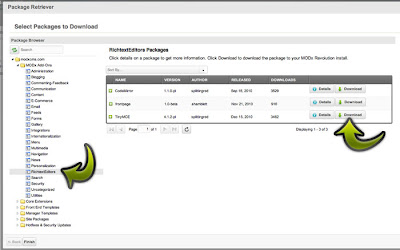
By clicking the small arrow next to ‘MODx Add-ons’, you’ll see the categories within it drop down. Select ‘Rich Text Editors’ from the list, and you’ll see the items on the right change. The one we want is TinyMCE, so click on the ‘Download’ button that corresponds with it, wait until that button changes to read ‘Downloaded’ and then click ‘Finish’ in the bottom left.


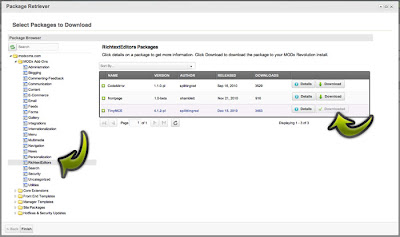
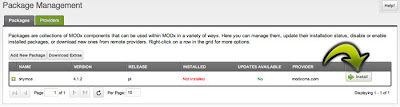
You’ll now see that TinyMCE has been listed, ready to be installed! Click on the install button, follow through the steps shown, and then you’re done.


If you go to the ‘Resources’ tab in the box on the left (next to ‘Elements’) and click on your ‘home’ resource, you’ll see that you’ve got a nice text editor thats been added to your main content area. Thats TinyMCE!


I think that’ll do for now. In the next post, we’ll go through templating, creating some pages for your site, and possibly investigate some of the other add-ons that are available.

If you have any comments about this tutorial, useful additions, corrections or whatever, please leave a comment.

Thank for reading!

Friday 14 January 2011

How to ... add a Twitter Feed to your Website

Yup, it's that time of the week again. Doesn't time fly?

This week I'll show you how to display your Tweets (or Twitter Feed) on your website or Blogger Blog using the Twitter Widget. This post does assume that you have a Twitter account and are using the 'new' version of Twitter, and have a website or blog to add it too!

1. First of all log in to your Twitter account, then click on your Twitter name in the top bar (highlighted by the pink arrow below) to access the menu & choose 'Settings'.


Screen shot from http://www.twitter.com/picseli on 14th January 2011

2. On the 'Settings' page click the 'Profile' tab and under where you can add a web address, you should see a message that says '(You can also add Twitter to your site here)', check out the pink arrow in the picture below, and click it - the link, not the pink arrow:

Screen shot from http://www.twitter.com/picseli on 14th January 2011

3. You'll then see a screen asking you to 'Select Your Widget'....

Screen shot from http://www.twitter.com/picseli on 14th January 2011

4. Choose 'My Website' and you'll get the following options:

Screen shot from http://www.twitter.com/picseli on 14th January 2011

Twitter explains pretty well what they do, so I won't go into that. To display your tweets click on the first option 'Profile Widget'.

5. On the next screen, on the right hand side, you'll see an example of how your feed will look. As you make chenges this will change so you can see exactly what you'll get. Check your username and if you are happy with what you've got, click the 'Finish & Grab Code' button and head to Step 9 below.

Screen shot from http://www.twitter.com/picseli on 14th January 2011

6. On the Preferences screen you can change how many tweets are displayed, how they are loaded etc. For every change you make, click the 'Test settings' button to view the changes. In the screen shot below I have:
  • Ticked 'Poll for new results?'- This means that the feed will be updated in real time, so when you tweet, the latest tweet is displayed without having to reload the page.
  • Ticked 'Include scrollbar?' - This means that if the space needed to display the twitter feed is longer than the box a scrollbar will be added.
  • Upped number of Tweets to be displayed to 10.
  • Ticked 'Show hashtags?' - if this is unticked it won't display any text that is preceeded with a #, so in the case of the #facebook tweet above, you wouldn't get the full meaning of the tweet.
  • Ticked 'Show avatars?' - to display people's images by their tweets.

Screen shot from http://www.twitter.com/picseli on 14th January 2011

The settings I haven't mentioned are:
  • Timed Interval - which will display tweets one at a time, rather than loading them all at the start.
  • 'Show Timestamps?' - which displays the timings of the tweets.
When you are happy with your settings, click on the Appearance tab on the left hand side.

7. On this screen you can change the colours of the widget to match your website, so play around and find the colours that suit. Here we've updated it to better match Picseli's colours:

Screen shot from http://www.twitter.com/picseli on 14th January 2011

Click on the text box or coloured square you want to update and use the colour picker, or if you have a corporate brand and access to the Hex codes you need to use, you can simply enter these. You'll notice your demo widget updates as you change colours, no need to click the 'Test settings' button.

When you're done, click on the Dimensions tab.

8. Here you can resize the widget to fit the space you need. This can be a bit tricky and may require a bit of trial and error to get it spot on, however, the auto-width option can be very handy here! Tick this option to have your widget fill the space available. Unfortunately, as it says, you can't test your size settings here.

Screen shot from http://www.twitter.com/picseli on 14th January 2011

9. When you are happy with your widget, click on the 'Finish & Grab Code' button. Here you'll be taken to a page with your HTML code (or, if you want to add your feed to Blogger, a handy 'Add to Blogger' button.)

Screen shot from http://www.twitter.com/picseli on 14th January 2011

If you know what to do with HTML, copy the code and do with it what you will!

If you don't, copy the code and send it to your friendly web developer and ask them to install it for you.

If you want to add it to a blogger site click on the 'Add to Blogger' button.....

10. You will be directed to the Blogger website, where you will be asked to login (if you aren't already) and then asked to select a blog and enter a title for your widget.

Screen shot from http://www.blogger.com on 14th January 2011

(If you click the 'Edit Content' link, you'll see the HTML code thats been passed from Twitter to Blogger.)

Click 'Add Widget' and Twitter will be added to your blog.

If you look towards the bottom of this blog in the right hand bar, you'll see Picseli's Twitter Widget!

Good luck & have a great weekend!

Tuesday 11 January 2011

MODx Revolution Tutorial for beginners – Part 1

Introduction
About 18 months ago, we stumbled upon a content management system called ‘MODx’. It sounded pretty fancy, so we took a closer look.

MODx is an open source, powerful PHP Content Management Framework. It does not include any constraints to the designer or developer, but it does have some fantastic add-ons and extras which make the process of building a website much quicker.

Some Housekeeping
One of the main advantages of MODx is the fantastic support and documentation that’s available. So before you get into anything too complex, be sure to check out the forums at http://modxcms.com/forums/index.php and also the brilliant documentation at http://rtfm.modx.com/dashboard.action. Both of these will be invaluable when you’re working with MODx.

Downloading MODx
First off, you’ll need to go and download MODx. So go to http://modxcms.com/ and you’ll see a big banner, like the one below!

Make sure you grab the latest stable version of MODx Revolution. The development team for MODx are continuously improving MODx, so the most recent version will be the most advanced.

Once you’ve downloaded it, you’ll need to open up your favourite piece of FTP software (we’re rather fond of Filezilla which you can grab from http://filezilla-project.org/). Then, simply unzip the downloaded file from MODx, and upload it to the root of your web server. There are a few thousand files that need uploading, so you can use this time to go off and set up your database!

Database Setup
Now one thing we need to note here is that we use a Microsoft Web Server (IIS 6.0). This has caused us quite a few headaches in the past, specifically with MODx, but that’s not the fault of MODx, more the fault of our server. Having said that, we’ve never come up against a problem that we couldn’t solve, but I felt it should be noted nonetheless. If you’re using an Apache web server (which you probably are, but you can find out easily enough by contacting your web hosts) then you won’t have any problems with things like Friendly URLs.

So, you’ll need to set up a database for MODx to play with. Depending on your server, this is usually a straightforward process. In order to get through the MODx installation process, you’ll need to know your database name, your database username and user password.

Installation
Once your database is all set up, and MODx has finished uploading to your web server, you’re ready to go and start the set up process. So go ahead and open up a browser window, and navigate to http://www.yourwebdomain.com/setup. You should then see the MODx set up screen!


Ok, so all good so far. The first screen you see is where you need to select your language. By default, its sent to English so for the majority, you can just leave it as is, and click the ‘Select’ button.


Click ‘Next’ on the following screen, until you reach the ‘Install Options’ screen. In order to carry out a fresh installation of MODx, you can leave all the options as they are by default, and click ‘Next’. The other options on this screen relate to upgrading an existing install, and thats something that will be covered in a future post.


Remember when you set up your database earlier? Well now it’s time to configure MODx to work with it. In all but exceptional cases, you will be working with a MySQL database, and your database host will be ‘localhost’, so you can usually leave the first two entries as they are. Next you’ll need to enter your database user login name, and the password for that user, and then enter the name of the database. You can leave the table prefix as it is, and click to test you database connection. If a message tells you that it can’t connect, you’ll need to go back and check your database details. Otherwise, you should get a message telling you that it’s connected successfully.


Next you’ll need to choose your character set and collation. For this, we use utf-8 for the character set, and utf8_unicode_ci for the collation. Again, the database needs to be tested before you can continue. Hopefully all will be well here, so we move on!


Now it’s time to select you Administrator username, e-mail address and password. This is the username and password that you use when you login into the admin section of MODx (which you’ll be doing a lot!) so make sure you use something memorable, but secure. Make a note of the username and password you use here, because you’ll need them again soon! Also, use a valid e-mail address that you have access to, because this is where your e-mails will go if you happen to forget your login details.


Now it’s time to install MODx. For peace of mind, your installation screen will show you if every part of the installation has gone smoothly, and if there are any warnings.


Presuming everything is ok so far, (we’re almost done!) it’s usually a good idea to remove your setup directory (you won’t need it again) by ticking the checkbox and clicking the ‘Login’ button.


You should then be shown your login screen. Remember where I told you to make a note of your username and password? Well, if you did, this is where you need to use them! Enter your details here, and presuming they’re correct, you can login, and you’ll have your first look at the MODx administration screen. Exciting!


One important thing to note, is that when you first navigate to your site domain to see what it looks like, it will be blank. This differs from MODx Evolution which would install with a demo site. If you wish, you can install a demo site for Revolution to help get you started from the Package Management screen in the Manager. Installing add-ons will be covered in a future post, but if you've any immediate questions, feel free to comment below!

Congratulations! That’s it, MODx is all installed and configured. In our next post, we’ll go over some of the basic set up features when you’re building your first MODx website! The next few posts will be much more interesting as we delve deeper into what MODx is all about. I promise magic, whizzing and bangs! So be sure to come back for the next post.

Now if you'll excuse me, I’m just off for a lie down...

Friday 7 January 2011

How to...merge your Facebook Page with your Places Page

Not a catchy title I know, but, you know, does what it says in the title (I hope!)

Back in December I blogged about How to Claim your business on Facebook Places and way (way) back in November 2008 I wrote a post explaining How to create a Facebook page for your Company. I have noticed that you now have the option to merge the two pages so you don't need to try to get 2 lots of fans ('likers') or update different statuses.

It is fairly straightforward, but as it is only the first week back in work....

So, first of all head to your Facebook Places page. This is how the current Picseli Places page looks:

Picseli's Page on Facebook Places

You'll notice that in the left hand column, just about the 'Share' button is a link that says 'Merge with existing page - click it and you will get a pop up box asking you which page you want to merge it with.

Merge pages pop-up box

Select the page you want to merge & click the 'Merge' button. You'll then be asked to confirm your choice.

Confirm request pop-up
And there you have it, your pages will be merged and any 'check ins' will now be visible on your main Facebook page, plus you'll see a 'Friend Activity' link (see box in left hand column below).

Merged Facebook pages

And there you have it. Simples!

I have been asked to update some previous posts as Facebook has changed the way they do things a bit, so if there are any How To guides you like to (they don't all have to be Facebook related) please let me know by commenting or send me a tweet.

- - - - - - - - - - - - -

UPDATE: I have recieved an email from Facebook to say:
"We have scheduled the Page migration from Page "Picseli" (http://www.facebook.com/pages/Picseli/173696612657206) to Page "Picseli" (http://www.facebook.com/picseli) . It might take up to a week to complete the process. Thank you for your patience."

So whether there will be more changes, I don't know! Will keep you posted.

- - - - - - - - - - - - -

Wednesday 5 January 2011

Keep your New Year's Resolutions with 10% off

Happy New Year  to you all!

We hope you had a lovely Christmas break and have come back to work feeling positive & optimistic for 2011 - I know we have!

We are also hoping that some of you have set a new year's resolution to set up a new website for your business or update your existing one. So, to help you keep your resolution, we are offering a 10% discount on new websites orders placed in January for our blog readers. So why not get in touch for a quote?

One of our resolutions is to make sure that we blog at least once a week (thanks to the challenge set by Wordpress), our key weekly post will be our 'How to' guides posted on a Friday, and have also been told that designer Neil has planned a monthly series on using Mod-X, so please make sure to subscribe to our blog so you don't miss out.

If you have any suggestions for a How To guide you'd like to see, please let me know by commenting here or sending us a tweet.

Here's to a great 2011!