Showing posts with label facebook. Show all posts

Friday, 11 March 2011

How to...link to your Facebook page

One of the most popular posts on this blog is 'How to add a Find us on Facebook button'. As it was written back in November 2008 it is now out of date. We have had a number of requests to update it, so here you go.


The Find us on Facebook button


Essentially the button was a marketing tool provided by Facebook to enable you to link to your page and you needed to know how to add an image & a link to your website for it to work. This is still the case and, as far as I am aware, you can still use the button if this is your preferred method of linking.

Facebook Icons


Another popular choice, if you use a number of social networking sites, is to line up a few icons and add a different link to each of them. There are plenty of people offering free icons for download for every site you can think of! A search for 'free social networking icons' will give you plenty of options. Or you can design your own to match in with the theme of your website.

The icons above were found on the following sites:
1, 4 & 5: http://blueblots.com
2: http://tydlinka.deviantart.com
3:
http://www.blog.spoongraphics.co.uk/

There's also a wide variety of Facebook icons on www.facebookicons.net.

Facebook Badges & Boxes

Facebook has made a few pages to enable you to link from your website to your page. We have covered adding a Facebook 'Like' box in a previous post, and another option you have is to add a badge.

If you follow the tutorial above, get to step 3 and instead of 'Add a Like box to your website' click 'Get a Badge'.

on the left hand side you have a number of options to choose from - Profile badges, Like badges, Photo badges and Page badges. Click on Page badges (if you aren't already on the right page).

To see how you can change the badge, click on the 'Edit this badge' to the right hand side to see the options available. Then just copy the code and add it to your website (or send it to your web developer).

This is just a very quick overview of the options available to you with the new Facebook pages, so if you'd like any more details or have anything else to suggest please comment and let us know.

Friday, 21 January 2011

How to....Add a Facebook 'Like Us' Box to your Website

Happy Friday Folks!

Today I'm going to show you how to add a 'Like Us' bos for your Facebook page to your website. It's a bit of an update from our 'How to add a Find us on Facebook button' post.

Step 1: Go to your business page on Facebook.
(If you haven't already got one, see our guide on how to create a Facebook page for your business.)

Click the button labeled 'Edit Page' in the top right hand corner of the page.

Screenshot of Picseli's Facebook page

Step 2: Click on the Marketing link

From the menu on the left hand side, click on the 'Marketing' link.


Step 3: Get the box

Here you will see a list of the options available to help you market your Facebook page & get more 'likers'.


Click on the 'Add a Like Box to youu Website'

Step 4: Customise your box

On this page you'll see an example box that you can customise to suit your company.


As you make changes to this little form you should see the example box on the right update to reflect your changes. 


- Facebook Page URL: In this box you need to enter the URL or web address of your facebook page. In our case it is http://www.facebook.com/picseli.

(If you don't have a customised or vanity URL yet, then you'll need to open up another browser window or tab, so you don't lose your current place, and navigate to yoru Facebook page. Then in the address bar at the top of the browser copy the whole text that appears starting with http://www.facebook.com/....., then paste this into the Facebook Page URL box.)

- Width: If you have a special place for your Facebook box to go, you'll know how wide it needs to be, so enter this width - in pixels - in this box.

- Colour Scheme: You can either have 'Light' (which leaves it white) or 'Dark' (which turns it black), so select dark, see what you think and make your decision. For Picseli, we'll be leaving it as Light.

- Show Faces: If you untick this option, you won't see the icons or avatars of the people who currently like your page.

- Stream: If you untick this option you will be left with just the people who like your page, not the latest posts to your page.

- Show Header: Untick this if you don't want the 'Find us on Facebook' banner at the top of the box.

So you can make your box as complicated or as simple as you like, showing your latest posts and 'likers' - as we have done in the right hand bar on this blog - or just have a simple 'Your Company on Facebook' link, as in the image below.

When you're happy with your box, select the 'Get Code' button.

Step 5: Display on your website

You'll get a pop up box with 2 code options, so copy whichever one suits you best (or copy both & send them to your web developer) and add them to a suitable place on your website or blog.

And there you have it, visitors can Like your Facebook page from the comfort of your own blog. Hope it helps!

P.S If you do enjoy these posts, please do come and like us on Facebook - don't foget to say Hi!

Friday, 7 January 2011

How to...merge your Facebook Page with your Places Page

Not a catchy title I know, but, you know, does what it says in the title (I hope!)

Back in December I blogged about How to Claim your business on Facebook Places and way (way) back in November 2008 I wrote a post explaining How to create a Facebook page for your Company. I have noticed that you now have the option to merge the two pages so you don't need to try to get 2 lots of fans ('likers') or update different statuses.

It is fairly straightforward, but as it is only the first week back in work....

So, first of all head to your Facebook Places page. This is how the current Picseli Places page looks:

Picseli's Page on Facebook Places

You'll notice that in the left hand column, just about the 'Share' button is a link that says 'Merge with existing page - click it and you will get a pop up box asking you which page you want to merge it with.

Merge pages pop-up box

Select the page you want to merge & click the 'Merge' button. You'll then be asked to confirm your choice.

Confirm request pop-up
And there you have it, your pages will be merged and any 'check ins' will now be visible on your main Facebook page, plus you'll see a 'Friend Activity' link (see box in left hand column below).

Merged Facebook pages

And there you have it. Simples!

I have been asked to update some previous posts as Facebook has changed the way they do things a bit, so if there are any How To guides you like to (they don't all have to be Facebook related) please let me know by commenting or send me a tweet.

- - - - - - - - - - - - -

UPDATE: I have recieved an email from Facebook to say:
"We have scheduled the Page migration from Page "Picseli" (http://www.facebook.com/pages/Picseli/173696612657206) to Page "Picseli" (http://www.facebook.com/picseli) . It might take up to a week to complete the process. Thank you for your patience."

So whether there will be more changes, I don't know! Will keep you posted.

- - - - - - - - - - - - -

Friday, 10 December 2010

How to... Claim your business on Facebook Places (Step 2)

Following on from last week's post that showed you how to check in & set up your business on Facebook, today I'll show you how to claim your business as your own.

1. Find your business
First of all you need to find your business, the quickest way to do this is to Check In, as I showed you last week. If you have already followed last week's instructions your business should now display on the Nearby Places screen, as Business Systems Services (UK) Ltd does in the screenshot below (again, taken from the Facebook for iPhone App).

Screenshot : Nearby Places

Once you have checked in, visit your profile page on the main Facebook.com website and you should see a post similar to below:


Click on your company name and you will see your business page.

Screen Shot of Facebook.com

2. Claim your business
On the left hand side, below the check in history and above the Share button, you'll see a link that says  'Is this your business?' Click this and you'll get a pop up box askign you to verify that you are an official representative of the business.Check the tick box and click Proceed to continue.


3. Fill in your details
On the next screen you will need to fill in your company details.


4. Verify your ownership
There are two ways to verify your ownership, as described in the form above. You can add an email address to your personal account or upload a document that proves your address.

I think Facebook have adequate help available on this, so I won't go into detail. If you do want more information then leave a comment below.

When you've filled in your details and chosen your verification process, click submit and you should get a message saying:

as well as an email from the Facebook team telling you that they have recieved your inquiry.

If you have added a second email address, you will need to verify it, so do this now.

5. Wait!
You now need to wait until Facebook get back to you to let you know it has all been approved.

Good luck! Let me know how you get on.

Friday, 3 December 2010

How to... Claim your business on Facebook Places (Step 1)

Hello & welcome to the return of 'How to Fridays'.

Today I will run through how to claim your business 'place' on Facebook Places. In brief, Facebook places allows people to 'check in' to a place to let everyonw know where they are. It is not being used (in the UK) to it's full advantage at the moment, so it's an ideal time for you to get to grips with it and set up your business while it's still relatively new. I won't go into the details of what it is, as the link above will give you a fairly good idea.


Why should you set up your business?
At the moment if your business isn't listed, people can check in and add any description they want, so the sooner you put your details in the easier it is for people plus you have some control over the place name. Everytime someone checks in it displays this on their Facebook profile, getting more visibility for your business. Plus if you are able to offer a special offer (10% off your order on first check-in, or free coffee for 3 check-ins in a week, for example) this can help spread the word and generate more business.


So how do you do it? 

I'll post steps over a few weeks otherwise this will be a loooong post! So Part 1 is 'Checking In'.

Step 1 : Check in to your own business
You cannot do this via the main Facebook.com website, so you need to have either the Facebook for iPhone App or visit touch.facebook.com site on a mobile device.

For this post I'll be using the Facebook for iPhone App, but the instructions are similar for the mobile site, the main difference is that you'll need to click the Places link or the little 'Check In' button to the right of the status update text box to get started. See screen shot below.

touch.facebook.com Screen Shot


Check In on Facebook Places using the iPhone App
Open up the app and you'll see your Facebook news feed similar to below:

Facebook for iPhone : News Feed

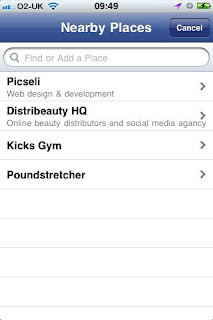
Click on 'Check In'and you'll be presented with a list of Nearby Places:

Facebook for iPhone : Nearby Places


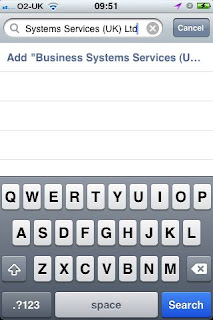
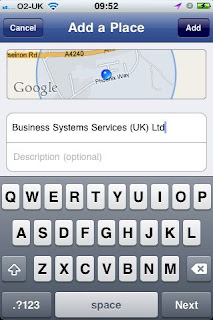
If your business isn't displayed start typing in the 'Find or Add a Place' text box. If it still doesn't come up you'll see a link similar to Add "Your Business Name" as in the screen shot below. Here we are adding our parent company - Business Systems Services (UK) Ltd.

Facebook for iPhone : Add your Business
Click the link and you'll be presented with a map, your business name & place to enter a description. Check that the map is correct, your business name is as you want it and enter a description, then click Add.

Facebook for iPhone : Add a Place

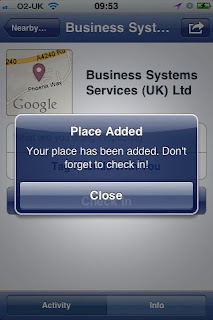
You'll then get a message to say it's been added and reminding you to 'Check In'.

Facebook for iPhone : Place Added

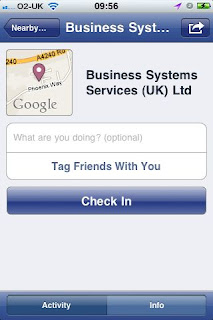
Close this message and you can then enter a status, such as 'In work', you can tag any friends that are with you (Just click on the link and it will display a list of your friends for you to select) and then Check In.

Facebook for iPhone : Check In
Click Done and your Check In will display in the news feed of all your friends.

Facebook for iPhone :

Come back next week to find out how to claim your business.

Friday, 14 November 2008

How to...add a 'Find us on Facebook' button

---------------
UPDATE 11th March 2011: With the new Facebook pages this tutorial is no longer completely accurate. For other ways to link to your Facebook page check out our new post: How to link to your Facebook Page. Thanks for all your feedback!

---------------

If you have followed last week's 'How To create a facebook page for your company' post you'll be wondering how you let people know about it. Apart from sharing it with all of your Facebook friends, you need to let customers, potential clients and non-facebook friends know about it.

The lovely people at Facebook have produced a button that you can add to your website telling people about your page. So how do you add it?

Step 1 - Find your page
Log in to Facebook and get to the page you want to promote. On the menu on the right hand side click 'Edit Page'.

Step 2 - How to promote your page the Facebook way
On the next page in the right hand menu under 'Communication' click 'Promotion Guidelines' and this page will tell you all you need to know about promoting your page and what you can and can't do.

Step 3 - Download the Badge
About 2/3 of the way down the page you will find the badge - simply right click and save to your computer.

Step 4 - Get the link to your page
Now, either send this to your web developer with the full link to your Facebook page (you are not allowed to link to the Facebook log in page) or add the button to your website where you'd like it to be with the link.

To get the link or URL to your facebook page simply get back to your page and copy whatever is displayed in the address bar of your web browser. For example, the link to the Picseli page is http://www.facebook.com/pages/Swansea-United-Kingdom/Picseli/33433262689

You'll have plenty of fans before you know it. Just remember to read and follow the Facebook guidelines.

Friday, 7 November 2008

How to...create a Facebook page for your Company

Number 2 in our How To guide is about promoting your company on Facebook. I have set up Picseli on Facebook and can now message users about promotions, new websites, events and general information.

Why Use Facebook?
I access Facebook every day to find out what my friends are up to and to catch up. If they have had a good or bad experience they tend to mention it, and word of mouth from someone you trust is worth an awful lot. For example, if I am looking for a particular product or service - a web designer perhaps - and a friend tells me she has just had a website designed, the service was great, the people were easy to get on with and the website is fab, I am much more likely to make contact with them than have to search through countless other web companies.

Facebook allows potential customers access to your company via someone they trust - their friends, family, colleagues and acquaintances. You can also upload images, marketing leaflets, and videos to help promote your service, and add a 'Find me on Facebook' button to your website.

Step 1 - Get a Facebook Account
First of all you need to have a Facebook account, or find a colleague with one!

Step 2 - Create a Page
The easiest way I have found is to get to the Picseli Page (a bit of a plug I know, and if you fancy becoming a fan, please do!) and scroll right down to the bottom of the page. Here you will find a link 'Create a Page for My Business', click this!

Step 3 - Enter your Details
Enter your details on the first page - choose between Area of Business, Brand or Product and Artist, Band or Public Figure. Selecting the option thatbest describes your business. Enter your name and click 'Create Page'

Step 4 - Add some Information
From here, there is plenty you can do to make your page useful. Enter your opening hours, upload your logo or photograph, include contact details, upload photos, write reviews - anything you want. The more information you add, the better!

(The on-screen instructions are pretty good, so I won't go into details, but let me know if you want a more detailed tutorial and I'll put something together.)

Step 5 - Tell people about it!
Once your page is ready, please don't forget to Publish your page, or it won't be seen by anyone. Once you have added some information you will see a message at the top of the screen telling you that 'This page has not been published' with a link to Publish your page.

The next step is to become a fan youself (simply click the 'Become a Fan' link on the right hand side) as this will appear on your profile, letting all your friends know.

Then you will find a link that says '+ Share' - click this and it will let you post a link to your profile with more details or send a message to everyone you know.

And there you have it.

What next?
The worst thing you can do now is to not update the page regularly. Use it to keep your fans informed of news, let them use it to get in touch, upload photos, start discussion, give them handy hints. Anything to keep it interesting!

If you do set up a page following this post, please post your link here and I promise I'll become a fan!