Showing posts with label social networking. Show all posts

Friday, 11 March 2011

How to...link to your Facebook page

One of the most popular posts on this blog is 'How to add a Find us on Facebook button'. As it was written back in November 2008 it is now out of date. We have had a number of requests to update it, so here you go.


The Find us on Facebook button


Essentially the button was a marketing tool provided by Facebook to enable you to link to your page and you needed to know how to add an image & a link to your website for it to work. This is still the case and, as far as I am aware, you can still use the button if this is your preferred method of linking.

Facebook Icons


Another popular choice, if you use a number of social networking sites, is to line up a few icons and add a different link to each of them. There are plenty of people offering free icons for download for every site you can think of! A search for 'free social networking icons' will give you plenty of options. Or you can design your own to match in with the theme of your website.

The icons above were found on the following sites:
1, 4 & 5: http://blueblots.com
2: http://tydlinka.deviantart.com
3:
http://www.blog.spoongraphics.co.uk/

There's also a wide variety of Facebook icons on www.facebookicons.net.

Facebook Badges & Boxes

Facebook has made a few pages to enable you to link from your website to your page. We have covered adding a Facebook 'Like' box in a previous post, and another option you have is to add a badge.

If you follow the tutorial above, get to step 3 and instead of 'Add a Like box to your website' click 'Get a Badge'.

on the left hand side you have a number of options to choose from - Profile badges, Like badges, Photo badges and Page badges. Click on Page badges (if you aren't already on the right page).

To see how you can change the badge, click on the 'Edit this badge' to the right hand side to see the options available. Then just copy the code and add it to your website (or send it to your web developer).

This is just a very quick overview of the options available to you with the new Facebook pages, so if you'd like any more details or have anything else to suggest please comment and let us know.

Friday, 3 December 2010

How to... Claim your business on Facebook Places (Step 1)

Hello & welcome to the return of 'How to Fridays'.

Today I will run through how to claim your business 'place' on Facebook Places. In brief, Facebook places allows people to 'check in' to a place to let everyonw know where they are. It is not being used (in the UK) to it's full advantage at the moment, so it's an ideal time for you to get to grips with it and set up your business while it's still relatively new. I won't go into the details of what it is, as the link above will give you a fairly good idea.


Why should you set up your business?
At the moment if your business isn't listed, people can check in and add any description they want, so the sooner you put your details in the easier it is for people plus you have some control over the place name. Everytime someone checks in it displays this on their Facebook profile, getting more visibility for your business. Plus if you are able to offer a special offer (10% off your order on first check-in, or free coffee for 3 check-ins in a week, for example) this can help spread the word and generate more business.


So how do you do it? 

I'll post steps over a few weeks otherwise this will be a loooong post! So Part 1 is 'Checking In'.

Step 1 : Check in to your own business
You cannot do this via the main Facebook.com website, so you need to have either the Facebook for iPhone App or visit touch.facebook.com site on a mobile device.

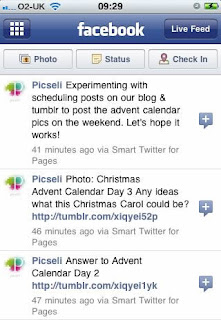
For this post I'll be using the Facebook for iPhone App, but the instructions are similar for the mobile site, the main difference is that you'll need to click the Places link or the little 'Check In' button to the right of the status update text box to get started. See screen shot below.

touch.facebook.com Screen Shot


Check In on Facebook Places using the iPhone App
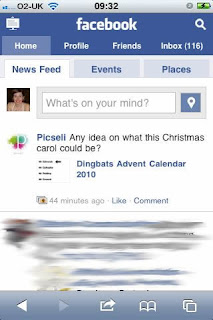
Open up the app and you'll see your Facebook news feed similar to below:

Facebook for iPhone : News Feed

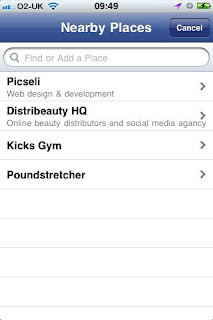
Click on 'Check In'and you'll be presented with a list of Nearby Places:

Facebook for iPhone : Nearby Places


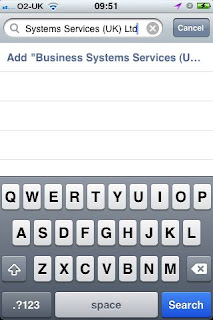
If your business isn't displayed start typing in the 'Find or Add a Place' text box. If it still doesn't come up you'll see a link similar to Add "Your Business Name" as in the screen shot below. Here we are adding our parent company - Business Systems Services (UK) Ltd.

Facebook for iPhone : Add your Business
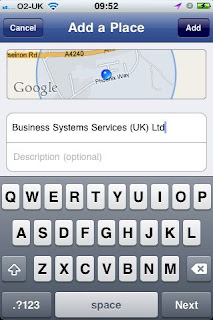
Click the link and you'll be presented with a map, your business name & place to enter a description. Check that the map is correct, your business name is as you want it and enter a description, then click Add.

Facebook for iPhone : Add a Place

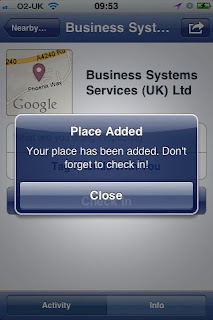
You'll then get a message to say it's been added and reminding you to 'Check In'.

Facebook for iPhone : Place Added

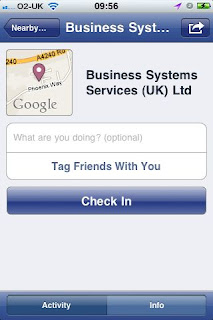
Close this message and you can then enter a status, such as 'In work', you can tag any friends that are with you (Just click on the link and it will display a list of your friends for you to select) and then Check In.

Facebook for iPhone : Check In
Click Done and your Check In will display in the news feed of all your friends.

Facebook for iPhone :

Come back next week to find out how to claim your business.

Wednesday, 25 August 2010

Tweet Inspiration

When you're stuck for something to tweet, take a look down the list below and something should inspire you!

Feel free to add more suggestions as comments too.

Tweet:

  1. 'Did you know?' facts about your cause
  2. An upcoming event
    • When is it?
    • Where is it?
    • Who will be there?
    • What's it for?
    • What's the aim?
  3. Your aims & objectives
    • How much money do you need to raise?
    • What is your mission?
    • How do you intend to get there?
    • How did you get started?
    • Why did you get started?
  4. The people involved
    • Trustees, your president or chairman, celebrities
    • Founders
    • Friends & Supporters
    • Sponsors
    • Say hello to new followers
    • Say thank you to re-tweeters
    • Facebook Fans
  5. News
    • Breaking news - what's just happened?
    • Are you in local or national press?
    • Has someone else tweeted about you? 
    • Articles relevant to your cause
    • Articles relevant to your location
    • Articles relevant to your followers
  6. Website
    • Your website address
    • Updates to your website
    • Link to Facebook page
  7. Images
    • Post publicity photos via TwitPic or YFrog
    • Old photos
    • Press images
    • Artist impressions
    • Photos of people
    • Photos of events
    • New logo or branding
  8. Fundraising
    • How much do you need to raise?
    • How much have you got so far?
    • How people are raising money
    • easyfundraising link
    • easysearch link
    • How people can help
    • Link to donation website or page
    • Link to online shops
    • How much was raised
  9. Ask a Question, then reply
    • 'What do you want to know about us?'
    • 'What would you like to see on our website?'
    • 'What events would you be interested in attending?'
    • 'How would you raise awareness for us?'
  10. Use #hashtags 
    • Get involved in #charitytuesday
    • Recommend for #followfriday
    • Or even #followmonday (#followtuesday, #followwednesday...)
  11. Use occasions
    • Say Happy Birthday
    • Merry Christmas
    • Happy New Year
    • Happy Easter
    • Happy Valentines Day
  12. Help others
    • Fundraising ideas
    • Re-tweet other causes' messages
    • Useful websites
    • Useful blog posts
    • Useful software
  13. Be personal
    • What kind of day are you having?
    • What's the weather like?
    • Are you going anywhere?
    • Have you been anywhere?
    • What are you doing today?
  14. Ask followers to help spread your message

I am not suggesting that you take this list, sit down at your computer and tweet all of it in one go - as this will probably lose you some followers! But if you haven't tweeted for a while and have a bit of 'tweeters block' take a look down the list, choose one and tweet away.

Wednesday, 18 August 2010

Boost awareness with Twitter


Now that your website is sorted it's time to start getting people to visit it.

Twitter is a micro-blogging tool. It gives you 140 characters to tell people what you are doing, what you're looking at, how you're feeling, what you're thinking about. It's a quick and easy way to update your site and keep people informed without having to write whole blog posts.

I have previously covered how to use Twitter so I won't repeat it here, but here are some suggestions on ways to make the most of your Twitter account.

1. Find people

Spend some time searching for people who will help spread your message or that you want to speak to. If you are looking for sponsorship follow local businesses. Find people involved with the cause that already tweet who will re-tweet your messages. Find your local press to help promote events.

2. Talk to people
You can either send people a private message (Direct Message) or you can tweet @ someone, which everyone can see. Twitter is about building relationships, so spend time talking to people - even if it has nothing directly to do with your cause!

3. RT people
In Twitterland RT means re-tweet, and there is a button available for you to quickly RT a tweet you find interesting. This is a quick and easy way of getting useful news and information to your followers.

4. Don't spam people
Don't write the same tweet over and over, yes you want people to visit your website, but telling them to visit your site every 5 minutes is one of the quickest ways to lose followers! If you add a news article, tweet that with a link to the article. Every now and then tell new followers about your aims. This doesn't mean to say you shouldn't repeat ever, for example if you are running an event tweet about different aspects of it, who will be there, when does it start, where will it be, what's the theme. Remember different people will be on Twitter at different times.

5. Keep it up
You don't need to tweet once an hour, but you should try to keep it regular, one good tweet a day is better than 24 'visit my website' tweets. To begin try spending 10 mins a day writing a tweet, finding one tweet to RT and looking for new people to follow. As you get to know Twitter and can see benefits you may decide to spend more time on it.

Wednesday, 4 August 2010

8 Features of Accessible Websites (Part 1)


Welcome to the second part of our 'Social Media 4 Non Profit' series.

This week we'll be looking at accessibility, making sure that when you do drive traffic to your website your visitors can get to the information they need. The World Wide Web Consortium (W3C) launched a Web Accessibility Initiative with the aim of ensuring that all web content is available to users regardless of technology, disability or ability. This had lead to the development of Web Content Accessibility Guidelines or WCAG.


In this post we will highlight 4 of the 8 features that we feel are most important for ensuring your website is accessible.

1.Your website works in any browser
Accessibility doesn't necessarily mean that users can't use a mouse or need bigger text, it can be as simple as making sure your website works in a wide selection of web browsers. All browsers render your website slightly differently, and even a few pixels can make a huge difference to the accessibility of your website.

As an example, we developed a website that had white text on top of a blue menu background. In Firefox and Internet Explorer it looked great, but in Safari the white text had dropped from the blue menu background onto the white page background so users couldn't navigate from the home page, making the site unaccessible to anyone using an Apple Mac.

2. Your website can be navigated and used without a mouse
Some of your visitors may be visiting your website without a mouse - either they are unable to, or their mouse may be broken or they may be on a mobile device, so you need to check that your website can still be used. Try going through your website using the TAB, SHIFT+TAB and ENTER or RETURN keys on your keyboard. If it can't be done visitors who cannot use a mouse will not be able to access your website content.

3. The text on your website can still be read when made bigger
Again, this isn't just for people who have problems with their sight, but also for people who are using a netbook perhaps or have changed their browser settings. Each browser allows users to set their preferred text size, so you need to check that your website will still be legible if the text size has been doubled and that menus are still usable.

4. Audio content is also available visually (and vice versa)
Surprise, surprise - it's not just those with hearing and sight disabilities that would like alternative content formats. Maybe speakers are broken or a computer doesn't have a sound card, providing a transcript of an interview or subtitles to a video clip can help everyone. Likewise someone with dyslexia may prefer to listen to an interview rather than read it, so either provide an alternative format or ensure that the content can be easily read by screen readers.

It's all about your audience
We could go into much more detail about accessibility (and it may be a future series perhaps!) but this post is intended to highlight 4 of the basic areas that should be considered. Your target audience (for example a non-profit dance group will have a totally different audience to a charity supporting blind people) will determine how far you need to follow the guidelines - just remember it's your audience you need to please!

If you feel there is anything I have missed or should add please comment below, all feedback is welcome and it would be great to make this series a comprehensive information resource.

Monday, 19 July 2010

Social Media for Non-Profit Organisations


In June we received a phone call from Melanie Davies of TREAT Trust Wales asking if there was any chance we could help out with their website. Not entirely sure what this would mean we arranged to meet up to find out exactly what they had in mind.

Once we met Mel and her husband Mike, and heard all about the trust and their plans to build a state of the art rehabilitation and therapy centre in Swansea, we were keen to get involved to help raise the profile of this worthy cause.

So, we wrote a proposal outlining changes we could make to the website, including ways that their website could bring in some additional funds, plus suggestions on how to use social networking websites to spread the word and increase awareness. They were delighted with our ideas but weren't sure where to begin. We have so far updated their website, set up a Twitter account and facebook page for them. Helped them sign up to the Amazon associates program and easyfundraising.

It's still early days with TREAT, but already there are people who now know more about the trust than they did last week, and we have already generated additonal cash for the trust.

Unfortunately we can't help every charity or good cause that gets in touch, but we can share some of our ideas with you to help you make the most of your online presence. So on this blog starting next Wednesday we will post some ideas and suggestions on how to improve your website, make use of social networking sites and even generate some cash towards your charity, cause, group, club etc.

If you have a question or topic you'd like us to cover leave a comment on this post and we'll do our best to help. If you do take any of our advice, we'd love to hear from you and feel free to link to your website, twitter account or facebook page.

See you next Wednesday?

Tuesday, 4 August 2009

Using Facebook

I have previously written a blog post about creating a Facebook page for your business. Facebook is still one of the first places I head to on the Internet, but is it business or pleasure?

How do I use Facebook?
I use Facebook primarily to speak to friends and found out what's going on. I created a page for Picseli to promote our services and show off examples of our work. All of these blog posts feed directly to my page, and I update the photo albums when we have completed a new design. Every now and then if there's a change in legislation or something of interest to report I will write on the 'wall'.

Benefits of Facebook
The main benefit I have found, is that you have access to a group of people you may not have spoken to about your business before. I quite often find that acquaintances don't have a full understanding of what you do, and Facebook can help you to show your friends, and friends of friends, what you do for a living.

As it's a constant information stream you are more likely to appeal to someone at a time when they are looking for your services. Again, similar to Twitter, if you can provide advice and information people are more likely to become a fan or visit your page to find out more rather than it coming across as a direct marketing tool.

With Facebook you are able to put a face behind the business. People can see that you are not a faceless corporation and can talk to you.

Disadvantages of Facebook
For many people it's a personal site and they will blank out any business messages because they're not in work. You are also speaking to a wide group of people - many of whom may never have an interest in your product.

A lot of people don't want to mix business and pleasure on Facebook especially as other people have control over what can be said about you. You do need to carefully consider how you want your business to be percieved and whether personal communications would negatively affect it.

Should You use Facebook?
Depending on how you manage it, Facebook could be beneficial to a number of organisations. Some examples below:

Not for Profit organisations can use it to let people know about events, latest news and recruit volunteers.

Fitness instructors can use it to present motivational tips.

Pubs & Clubs can post details of events, special offers, photos.

IT Companies can inform fans of security updates, virus alerts, useful tips and facts.

Monday, 3 August 2009

Using Twitter

Back in November, I posted about How to Use Twitter, which explains how to set up an account and get started. I've been tweeting for 9 months and this is why I tweet, and how I have found it.

Why do I tweet?
Initially i started to tweet to help promote this blog and our website. As far as I was concerned it was a marketing tool to help bring traffic to my website. Now it has become a great resource for getting information, especially from people such as @StartUpDonut and @MarketingDonut. There are plenty of people willing to share information they have found. I have found that as time goes by I want to use to it give information to other people - hence this series, and the one on writing content. As it happens, this has brought more traffic to my site and helps to create a dialogue with customers.

How often do I tweet?
If you search the web you'll find many different answers to the question 'How often should i tweet?' My general rule - if you have nothing to say, then don't tweet. I try to make sure my tweets mean something, or re-tweet something interesting...although every now and then I think it is nice to see that there's a real person behind the company and will wish everyone a Happy Monday or let people know what's going on in the office.

I aim to tweet between 1 and 10 times a day.

What do I tweet?
Looking back at my tweets, they tend to fall into these categories:

1. Niceties
For example, e.g. 'Good morning'
http://twitter.com/picseli/status/3100400683

2. Office happenings
'Working on to do lists' or 'writing proposals'
http://twitter.com/picseli/status/2324464855

3. Customer news
'New website live'
http://twitter.com/picseli/status/2419943524

4. Things I find interesting or think others may
At the moment, Swine flu updates or marketing information
http://twitter.com/picseli/status/2419943524

5. Updates to our blog
http://twitter.com/picseli/status/1882734617

What benefits have I seen?
This is tricky. I can't say that we have made a direct sale to a Twitter follower. I can tell you it helps with search engine searches for our company name, and that I have made new local contacts via Twitter. It's a good icebreaker at off-line networking events when you meet a company you're following. And I have definitely learnt a lot and found some useful links along the way.

So should you tweet?
I can't imagine a company or organisation that wouldn't benefit from tweeting. Some examples below:

Accountants & Solicitors
Keep your customers updated on deadlines, changes in legislation, new services and company news.
Example: @JCPSolicitors

Not for Profit
Help spread your message, let people know about events, provide facts and figures, tell people how they can help.
Example: @HelpStopCruelty

Retailers/eCommerce
Tell people about sales, new products, the security features, what makes you different.
Example: @asos

August is Social Media Month

At Picseli, we are all fascinated by the web and all of the applications available to help find information, meet people, play, make life easier, etc etc. We spend most of our day in front of the computer and some of it online researching, reviewing, networking to find out what the next big thing will be.

Social Media & Networking has become a huge online activity, and can help to boost your business and increase awareness. However, it can be time consuming and can take a whole to see the results - especially for a small business.

Throughout August, we will visit a number of social media websites, explain how and why we use them and how they could help your business. To stay up to date follow us on twitter.

Friday, 2 January 2009

How to...Add goals on 43Things

See my previous post regarding 43Things.

As I said that I would add a 'How To' every Friday, I felt it a bit wrong to fall at the first hurdle. So, to get you started on the right track this is a mini guide to 43Things.

Step 1 - Visit www.43things.com

Step 2 - Click 'Sign Up'
It's the big blue button on the home page.

Step 3 - Fill in your details
It's not a big form, just enter your Username, Email, Password and the letters from the box. Click 'Create an account'.

Step 4 - Enter your goals
Simply write your resolution in the text box and click 'I want to do this'.

The website is so easy to use. You can add little diary entries to help you track progress and set reminders.

Complete your Goal
Once you have completed the goal select it and click 'I'm Done'. You get a congratulations message and the chance to help others by writing your story.

Cheer Others
When you find people and goals you want to support you can send them a cheer to help them along. So let us know if you set up an account and we'll come and support you.

Good luck!

Friday, 12 December 2008

How to...Set up a Blog

A blog is a great way of starting a website without having to know about html or register a domain name and there are many free services available. This blog is powered by Blogger.com which is a free service owned by Google. It's very easy to set up and get started. The hardest thing is deciding what to write about.

Step 1 - Get a Google Account

If you already have a Google account all you need to do is visit http://www.blogger.com/ and sign in using these details.


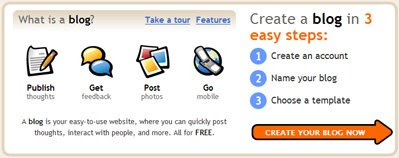
If you don't have a Google Account you can create one here. Just click 'Create Your Blog Now' in the big orange arrow and fill in the details on the next page then click Continue.


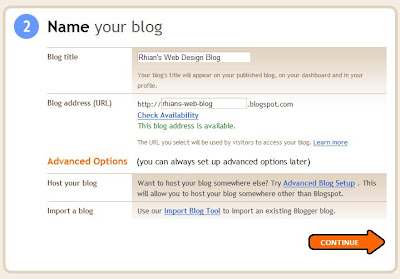
Step 2 - Choose a Name


On the next page you will need to fill in the details for the name of your blog.


The blog title is what will appear in the header of your blog. For example, 'Rhian's Web Design Blog'.

The blog address is what people will need to find your blog, I would use 'rhians-web-blog' in this case. Click the 'Check Availability' link to see that the name you have chosen isn't being used by someone else. Then click continue.

(This is a basic set up, so we're ignoring the Advanced Options for now.)

Step 3 - Choose your Style

Select the design you like best for your blog and click continue.

Step 4 - Start Blogging
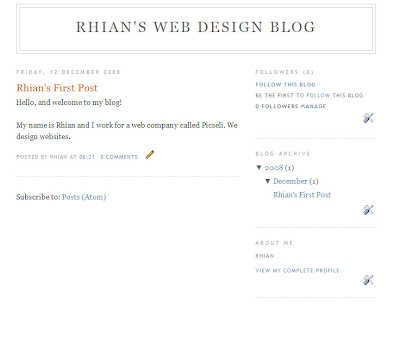
Yup. That's it! All you need to do now is click 'Start Blogging'. The next screen will display the Create a Post screen. Simply enter your title and blog entry and click Publish Post. Your first blog post! To view your blog, click 'View Blog'.


Here's the one I created while writing this post:


The little pencil icon will allow you to quickly edit a post while you are logged in, and you can add Tags, change the layout, add widgets and loads more...but I'll leave that for another blog post!
Again, if you do set up a blog after following this How To, please post it here. Good luck!!

Friday, 21 November 2008

How to... use Twitter

You may have noticed a block on the right hand side of the main website titled 'Twitter Updates'. For those of you that don't know, Twitter is a micro-blogging tool. It gives you 140 characters to tell people what you are doing, what you're looking at, how you're feeling, what you're thinking about. It's a quick and easy way to update your site and keep people informed without having to write whole blog posts.

Follow and be Followed
Once you have set up your account with Twitter you can find and follow people - your friends and family, companies (for example Firebox are on Twitter) or people you're interested in. You can even send direct messages.

What are the Benefits?
These are the benefits according to me...feel free to Tweet or blog others.
  • It's easy to do
  • It eases you into blogging and the mentality behind it
  • You're likely to find some interesting people, websites and blogs
  • It's fun (really, I enjoy tweeting!)
  • It's a great way to promote new services, products and events
  • You can add a feed to your site so it's always getting updated

Step 1 - Sign Up
First of all you need to set up a Twitter Account so go to http://twitter.com/ and click 'Join the Conversation'. Simply fill in your details and off to go!

Step 2 - Your first Tweet
Now the pressure is on - what will be your first tweet? Tell people why you have started, tell them what you are thinking RIGHT NOW, tell them what you had for dinner. The more interesting the better. Maybe you want a theme for your tweets? I have found a guy that tweets everything he has to eat, for Picseli it's all about the company and what we are up to.

Step 3 - Find some Friends
It can take time to get a huge following on Twitter, but so that people can find you - you need to find people. So look up your friends or send them an email, go to http://search.twitter.com/ and search for people tweeting similar things to you then follow them.

Step 4 - Keep it up
So that people who find you want to follow, you need to make sure you keep tweeting! If you have decided on a theme - stick to it. Why not provide links to useful blog posts you've found? If you have decided to set up a feed on your website there is nothing worse than it showing your last tweet was months ago!

As a first step why not follow Picseli?

ADDED 27/11/2008:
A great list of ways to use Twitter can be found here http://www.doshdosh.com/ways-you-can-use-twitter/

Friday, 14 November 2008

How to...add a 'Find us on Facebook' button

---------------
UPDATE 11th March 2011: With the new Facebook pages this tutorial is no longer completely accurate. For other ways to link to your Facebook page check out our new post: How to link to your Facebook Page. Thanks for all your feedback!

---------------

If you have followed last week's 'How To create a facebook page for your company' post you'll be wondering how you let people know about it. Apart from sharing it with all of your Facebook friends, you need to let customers, potential clients and non-facebook friends know about it.

The lovely people at Facebook have produced a button that you can add to your website telling people about your page. So how do you add it?

Step 1 - Find your page
Log in to Facebook and get to the page you want to promote. On the menu on the right hand side click 'Edit Page'.

Step 2 - How to promote your page the Facebook way
On the next page in the right hand menu under 'Communication' click 'Promotion Guidelines' and this page will tell you all you need to know about promoting your page and what you can and can't do.

Step 3 - Download the Badge
About 2/3 of the way down the page you will find the badge - simply right click and save to your computer.

Step 4 - Get the link to your page
Now, either send this to your web developer with the full link to your Facebook page (you are not allowed to link to the Facebook log in page) or add the button to your website where you'd like it to be with the link.

To get the link or URL to your facebook page simply get back to your page and copy whatever is displayed in the address bar of your web browser. For example, the link to the Picseli page is http://www.facebook.com/pages/Swansea-United-Kingdom/Picseli/33433262689

You'll have plenty of fans before you know it. Just remember to read and follow the Facebook guidelines.

Friday, 7 November 2008

How to...create a Facebook page for your Company

Number 2 in our How To guide is about promoting your company on Facebook. I have set up Picseli on Facebook and can now message users about promotions, new websites, events and general information.

Why Use Facebook?
I access Facebook every day to find out what my friends are up to and to catch up. If they have had a good or bad experience they tend to mention it, and word of mouth from someone you trust is worth an awful lot. For example, if I am looking for a particular product or service - a web designer perhaps - and a friend tells me she has just had a website designed, the service was great, the people were easy to get on with and the website is fab, I am much more likely to make contact with them than have to search through countless other web companies.

Facebook allows potential customers access to your company via someone they trust - their friends, family, colleagues and acquaintances. You can also upload images, marketing leaflets, and videos to help promote your service, and add a 'Find me on Facebook' button to your website.

Step 1 - Get a Facebook Account
First of all you need to have a Facebook account, or find a colleague with one!

Step 2 - Create a Page
The easiest way I have found is to get to the Picseli Page (a bit of a plug I know, and if you fancy becoming a fan, please do!) and scroll right down to the bottom of the page. Here you will find a link 'Create a Page for My Business', click this!

Step 3 - Enter your Details
Enter your details on the first page - choose between Area of Business, Brand or Product and Artist, Band or Public Figure. Selecting the option thatbest describes your business. Enter your name and click 'Create Page'

Step 4 - Add some Information
From here, there is plenty you can do to make your page useful. Enter your opening hours, upload your logo or photograph, include contact details, upload photos, write reviews - anything you want. The more information you add, the better!

(The on-screen instructions are pretty good, so I won't go into details, but let me know if you want a more detailed tutorial and I'll put something together.)

Step 5 - Tell people about it!
Once your page is ready, please don't forget to Publish your page, or it won't be seen by anyone. Once you have added some information you will see a message at the top of the screen telling you that 'This page has not been published' with a link to Publish your page.

The next step is to become a fan youself (simply click the 'Become a Fan' link on the right hand side) as this will appear on your profile, letting all your friends know.

Then you will find a link that says '+ Share' - click this and it will let you post a link to your profile with more details or send a message to everyone you know.

And there you have it.

What next?
The worst thing you can do now is to not update the page regularly. Use it to keep your fans informed of news, let them use it to get in touch, upload photos, start discussion, give them handy hints. Anything to keep it interesting!

If you do set up a page following this post, please post your link here and I promise I'll become a fan!